- Feb 22, 2024
Sam's Fool-Proof Easy Painting Tutorial
- Samantha Ludwitzke
- 0 comments
Ever wished you could whip up hand-painted signs in a flash? Say goodbye to tedious detail work and hello to quick, gradient painting magic! This tutorial will guide you through speedy techniques that give your projects a touch of whimsy and a pop of color.
No artistic experience or fancy supplies needed! We'll be using simple craft paints, inexpensive foam brushes, and a two-tone painting method to bring laser-cut character sets (think playful pets, fun forest animals, and even fantastical beasts!) to life with easy-to-master techniques.
Get ready to unleash your inner artist and discover the joy of creating fun, colorful signs in just minutes!
Are you ready to dive in? Let's grab our supplies and embark on this creative adventure!
Here's what you need:
Laser file from Samantha's Doodles - available HERE in the "BE YOU" section. I chose the lion for this tutorial, but there are TONS of characters available!
MDF - I like to use 1/4 inch - I get mine from Craft Closet
Craft paints - I like these from Michael's
Foam brushes - you'll need a couple - this pack is perfect
A dotter tool (or the back end of a regular paint brush, or the tip of a pencil - you don't need anything fancy!)
Paper plates, cardboard, etc. - something to protect your surface & make sure the paint doesn't seep through
You can follow the video below, or continuing reading for the written instructions!
*I was experimenting with the new Meta Wayfarer glasses here, so I apologize it's kind of shaky. I think these will be great for capturing clips of events, but I'll try to stick with an overhead camera for my tutorials from now on!
Here's what you'll do:
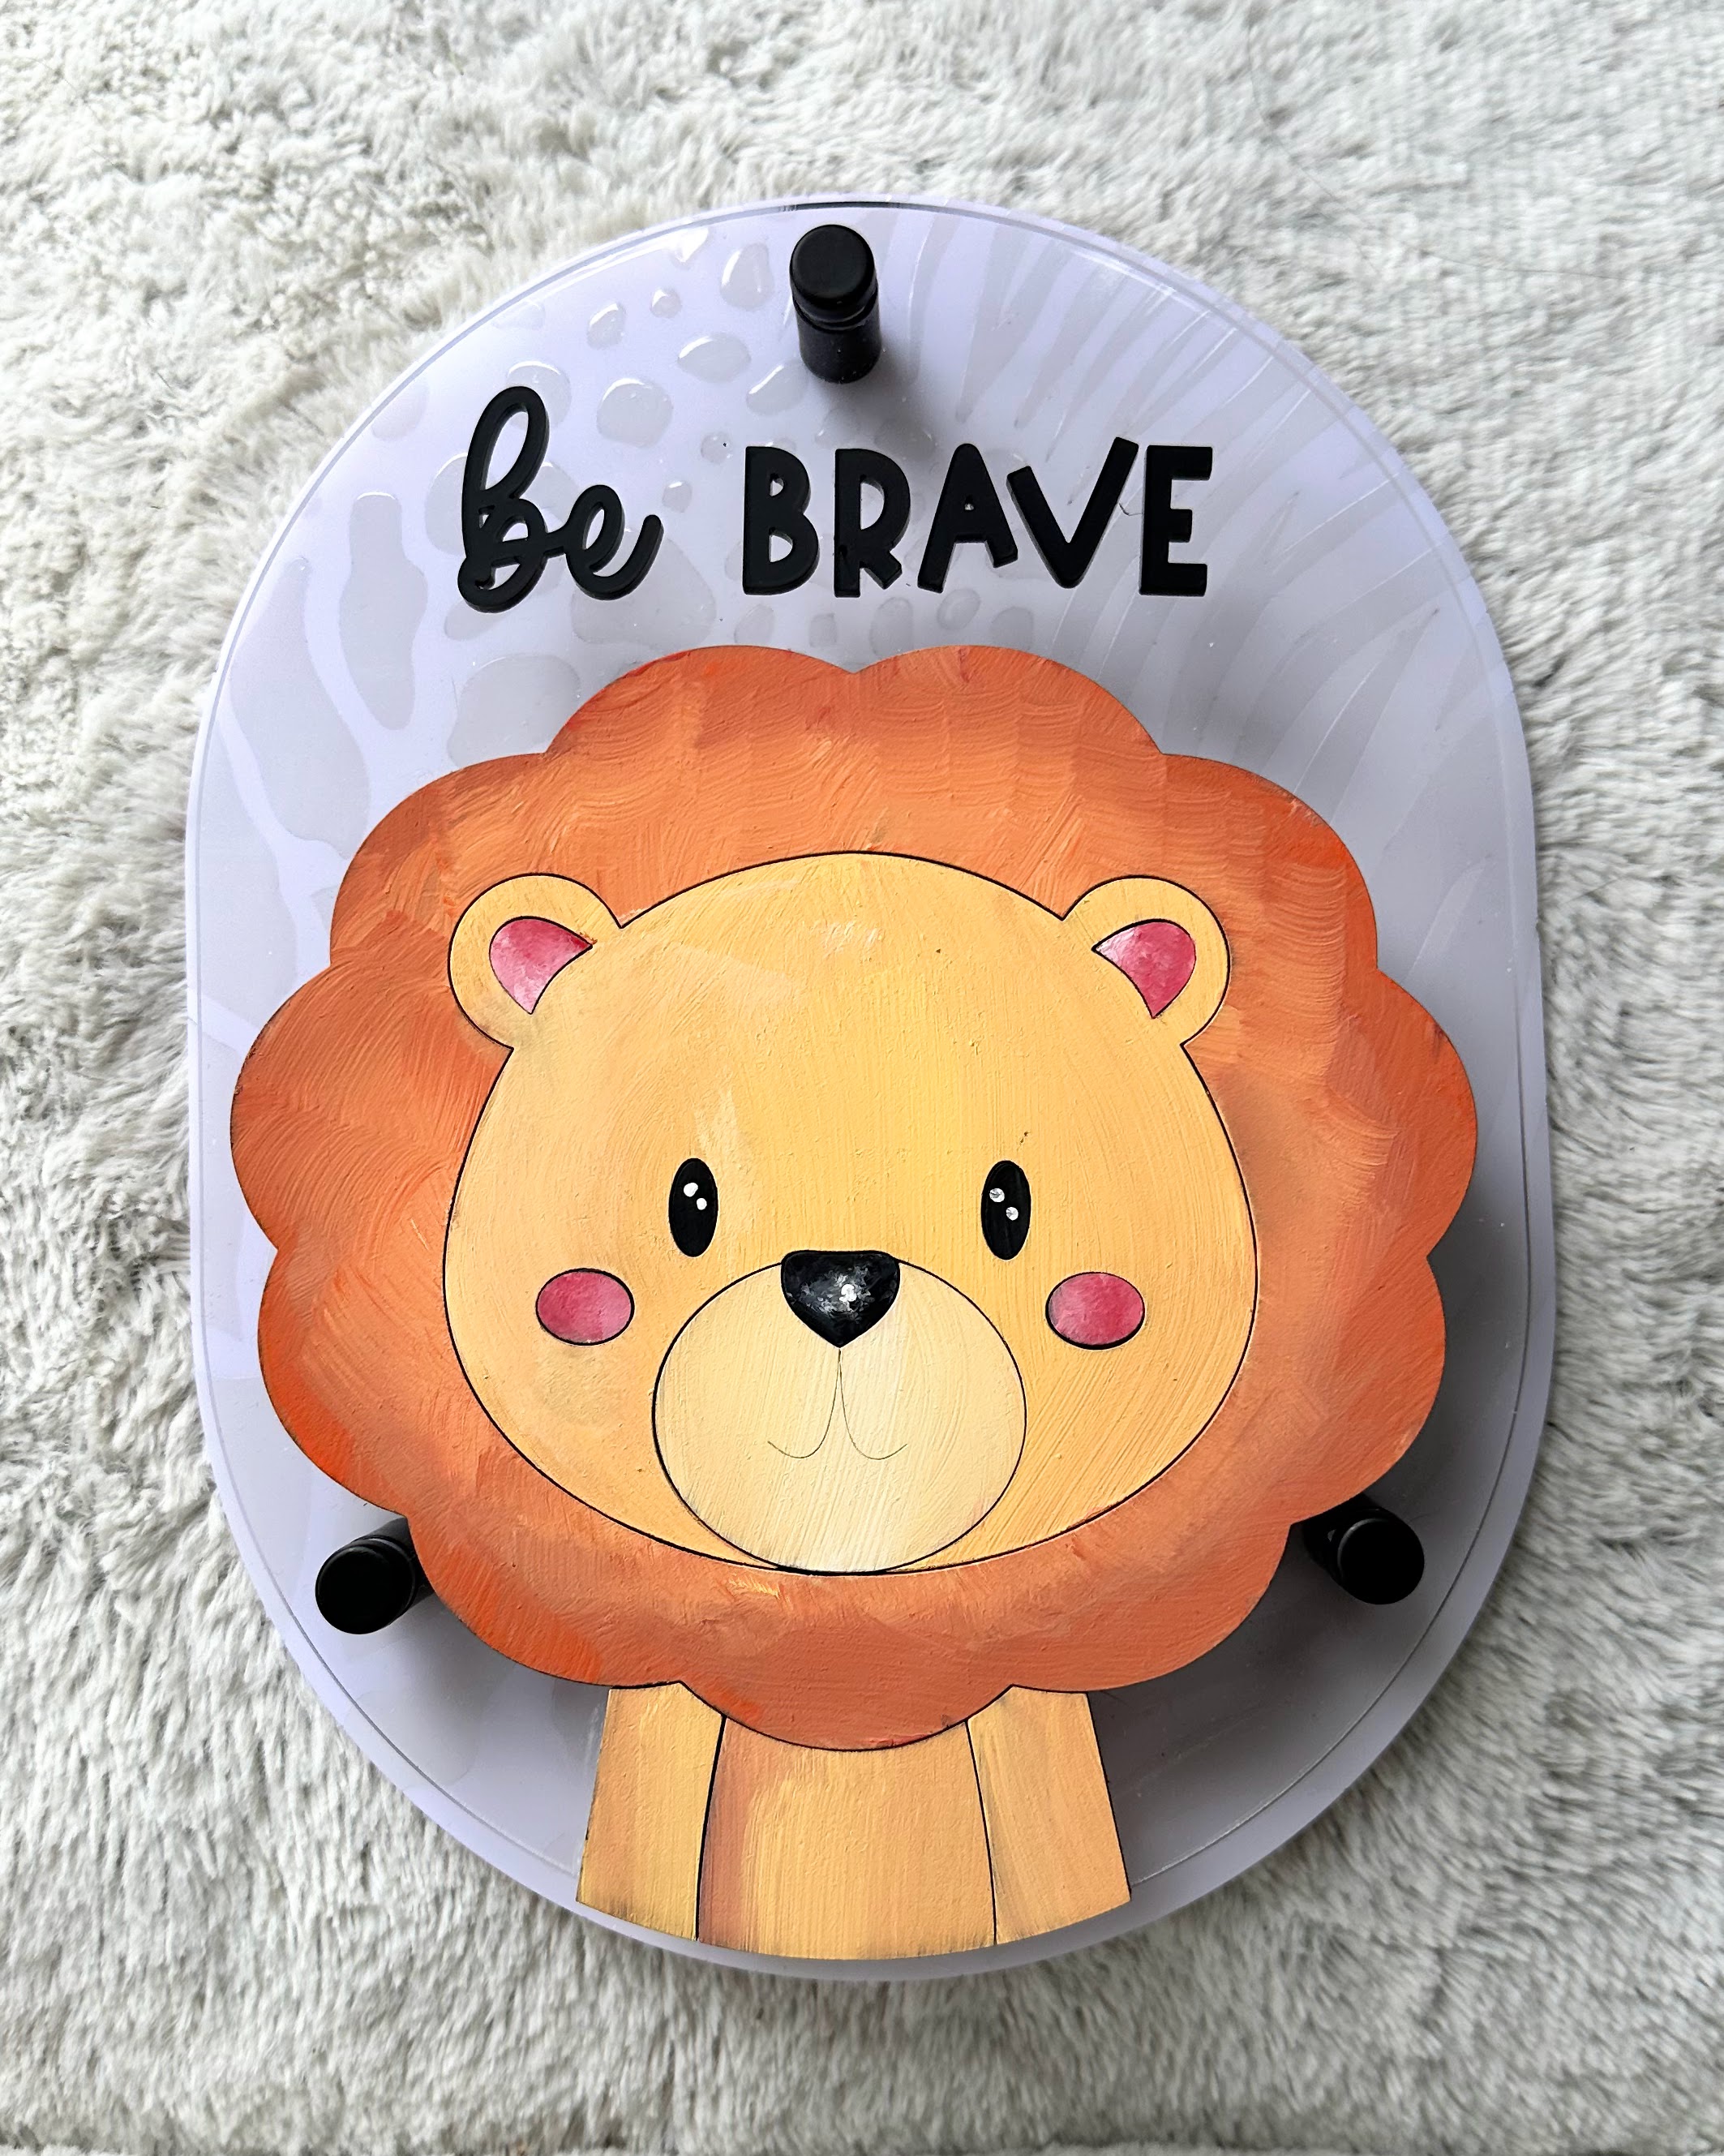
Cut your chosen character from 1/4 inch MDF using your laser. For this tutorial, we'll use the lion character.
Select your colors. For the lion, we're using yellow, red, orange, pink, black, and white.
Pour a nickel sized amount of red, yellow, and orange paint and a dash of white, black, and pink paint on a paper plate (or your chosen surface).
Separate your pieces by what color they will be. For the lion, we are going to have an orange mane, yellow face and body, rosy pink cheeks and ears, and black nose and eyes with white accents.
We'll start with the face.
Use a clean foam brush and pick up some yellow paint on the top of the brush.
Dip the corner of your paint brush in the orange paint (just a tiny bit).
Start at the left side of the lion with your orange paint on the left side of your paint brush and make downward strokes as you paint the lion's face.
The orange will blend into the yellow as you move towards the other end of the face.
Do not clean your brush!
Pick up more orange paint on the entire top of your paint brush.
If necessary, dab it on your paper plate so it isn't too thick.
Using the same downward brush strokes, add the orange to the outer edges of the face moving towards the center, but don't go all the way across. As you do this, it will blend with the yellow. Add more orange (or yellow if you add too much!) and repeat from the other side.
Blend as much or as little as you like by adding yellow paint and repeating your brush strokes. You can also dab your brush on your paper plate to blend the colors slightly before painting. Note that this step is personal preference.
Because you aren't cleaning your brush in between adding the colors, it will blend them together and leave brush strokes and add texture/shading to your character.
You can also add a dash of white in the middle of the face piece if you think it needs it to brighten it up. Again, blend with yellow as needed.
Repeat this same color pattern on the body pieces.
I like to make the center piece yellow in the center with outer edges orange, and then have each of the outer pieces have one orange side blending into a yellow side.
Repeat the same technique on the mouth piece, but use yellow and white instead of adding more orange.
Place these pieces off to the side to dry.
Now we will paint the mane. For this, we'll be using the same brush - do not clean it off - you can dab it on your paper plate, but don't rinse it.
Pick up orange on your brush and start painting the mane - you can use brush strokes in any direction. Because there was yellow on your brush before the orange, it will show through in some areas.
Add more orange paint as needed until the whole mane is painted.
From here, add some red to your paint brush and paint it on to the outer edges of your mane. You can brush in different directions for this step since manes are supposed to be a little bit wild.
Use orange to blend as needed by repeating the same brush strokes over top of any areas that you think need it. Again, this is personal preference!
Place the mane off to the side to dry.
Let's move on to the cheeks and ear pieces. You will be using a new brush for this section.
Dip one corner of your brush in red and the other in pink.
Alternate dabbing these colors on your pieces. Let it blend to a medium pink. Add red around one edge and pink on the opposite end. Dab with the middle of your brush tip to blend slightly.
Blend as much or as little as you think is needed. Repeat until all 4 pieces are finished.
Set these pieces to the side.
Pick up another clean brush.
Paint the eyes and nose black.
Set the eyes aside to dry slightly.
Pick up the nose and put a dash of white on the corner of the same brush.
Dab it in the center of the nose.
Alternate dabbing with the white and the black sides of your brush and create a soft gray tone.
Use your dotting tool (or other pointed object) to add a dot of white in the center of that gray tone.
Use the dotting tool to add dots to your eye pieces as well. I like to do two dots - one larger and a slightly smaller one diagonally below.
Place these to the side to dry.
Hey, guess what? You're done painting now. It's that easy.
From here, you can simply let your pieces dry and then glue up your character on the sign backer of your choice. If you aren't a fan of the layered effect that comes with this file, you can purchase a patterned backer from my shop and use that instead!
This painting technique can be applied to any color combos for just about any type of character or sign element. I like it because you literally can't mess it up - because you're constantly blending, you can go over each piece as many times as you need and it somehow looks intentional once it dries.
It's fool-proof.
If you try this out, I'd love to see! Drop a comment below or tag me (@SamanthasDoodles) on socials.