- Feb 6, 2024
Learn How to Design with Samantha: Layered Name Keychains in Silhouette Studio
- Samantha Ludwitzke
- 0 comments
I've seen a few posts in forums I'm in where makers are asking how to make name keychains, so I wanted to make a post on how to design them using a few of the more popular design programs. I did a video on Adobe Illustrator, but I know not everyone uses that program, so I wanted to go over some other options as well.
Materials:
1/8 acrylic in two different colors - I am partial to Craft Closet, Cerulean Tides, Houston Acrylic, Custom Made Better, or Smokey Hill Designs.
Keychain thingie connector piece
Split ring
Adhesive - I use either double sided adhesive tape or All Craft glue from CT
Your laser
-
Design program of your choice. Here are the links for Lightburn, Inkscape, and Adobe Illustrator.
Below, I've broken out the instructions for Silhouette Studio. Keep in mind you will need to have the Silhouette Business Edition in order to export SVGs - I purchased the upgrade here for $49.99, it is a one time fee.
Here's how to create your own using Silhouette Studio (Business Edition)
(The default Silhouette Studio keyboard shortcut guide can be found here!)
-
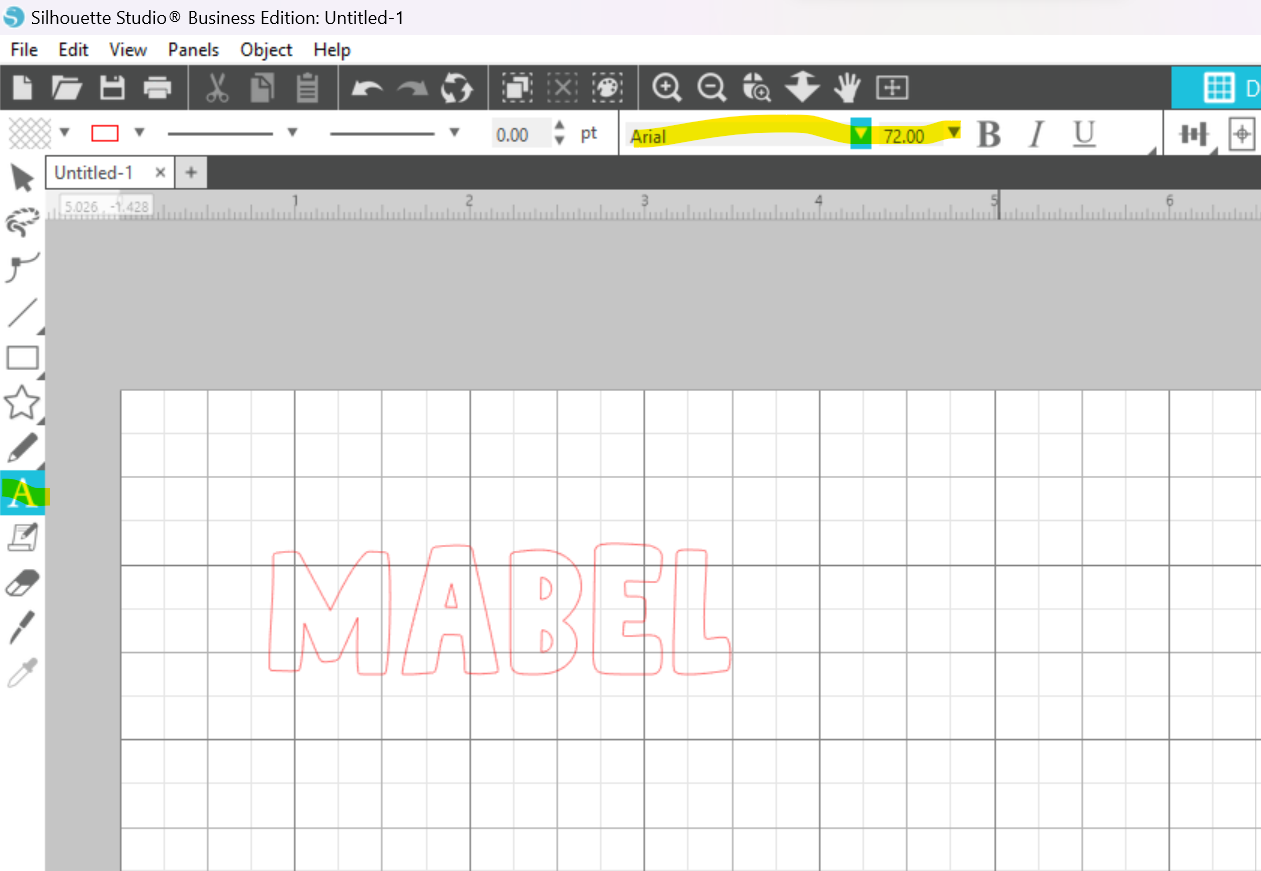
Type text and choose font. I used Patchwork from Creative Fabrica. (This is an affiliate link and I may earn a small commission if you purchase from it.) I recommend making your keychain around 3 inches in length. When making your text, keep this in mind that you will be adding about an inch of offset around it.
-
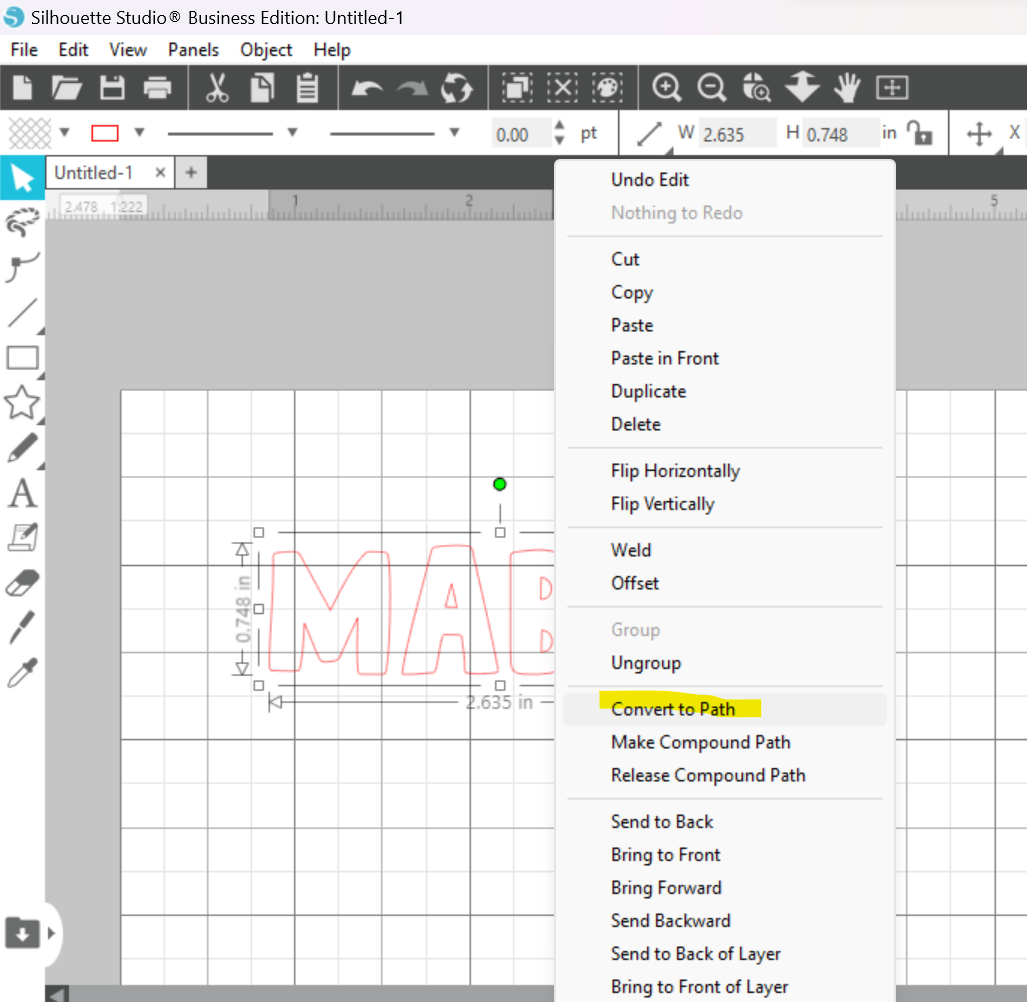
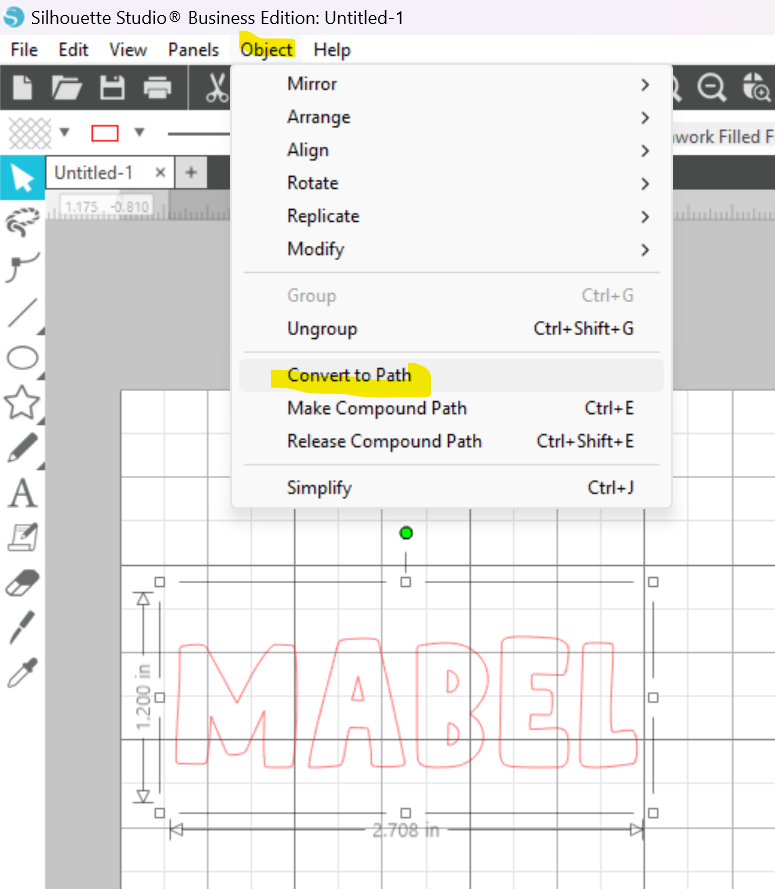
Convert text to path by either right clicking and selecting "Convert to Path" or going to the "Object Menu" and selecting "Convert to Path."
Note: if you use a script font, you will need to weld your letters at this point so it becomes one solid piece to cut out. I explain where to find this function in step 11. If you use a block font with individual letters, you do not need to weld them. -
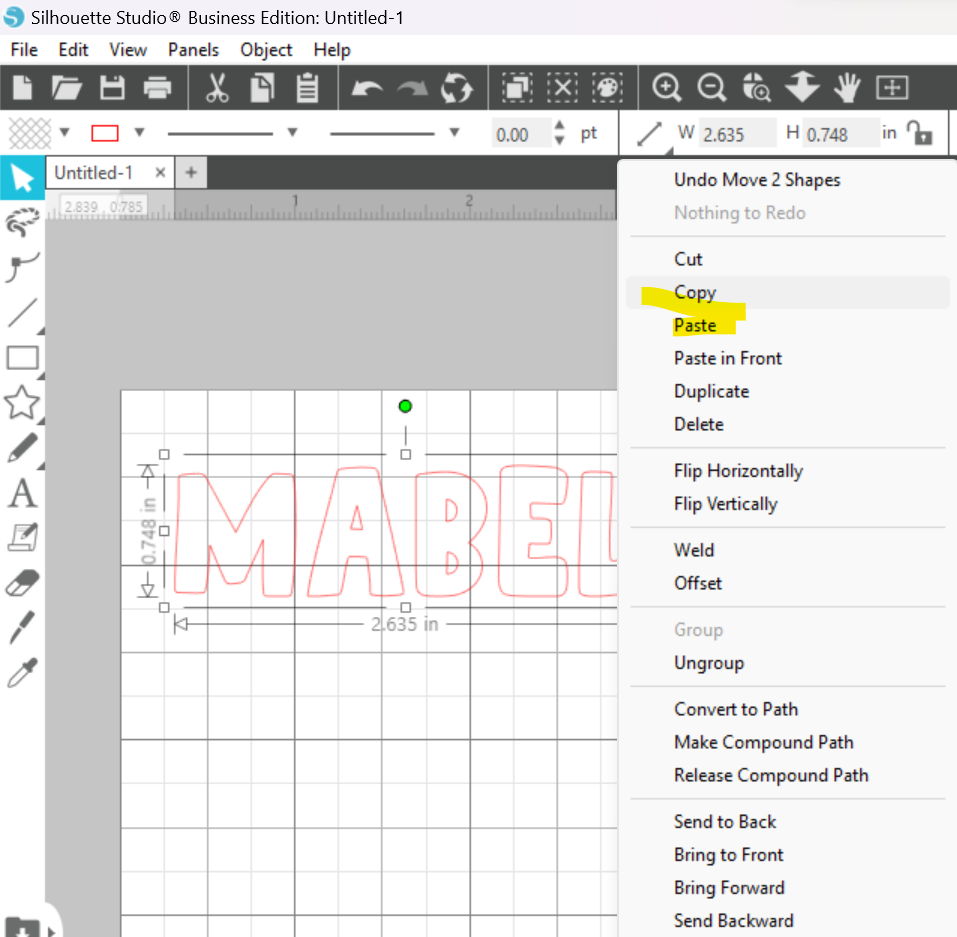
Copy using CTRL + C (Windows) or CMD + C (Mac) and Paste using CTRL + V (Windows) or CMD + V (Mac) or right click and "Copy" and "Paste" to duplicate your text.
-
Create your 2 offsets by following the below instructions. One will be for the interior offset (aka inset) to help with scoring placement, and one will be your contour cut backer piece for the base of the keychain.
Click on the duplicated text.
-
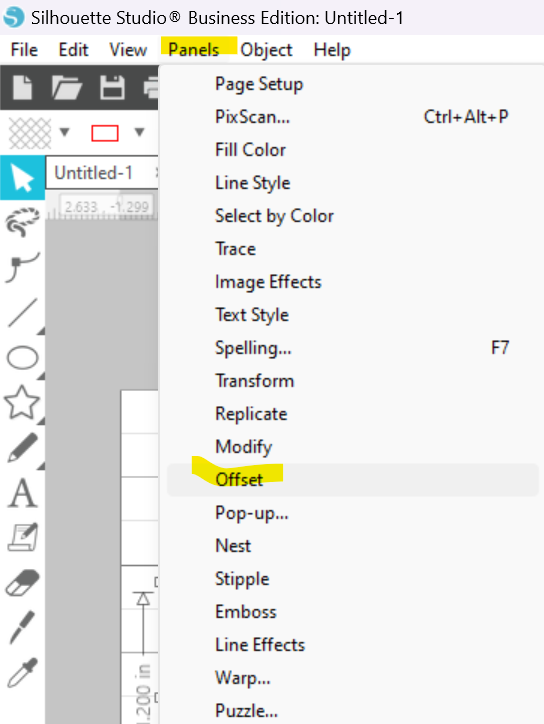
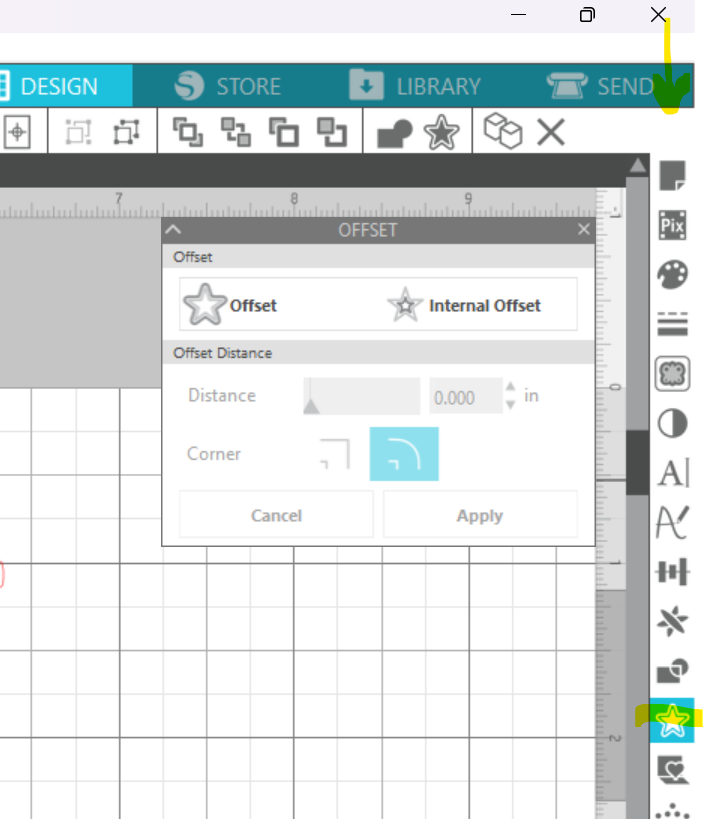
Select the "Offset" panel by either going to the "Panel" Menu and selecting "Offset," or by selecting the star icon on the right hand toolbar.
-
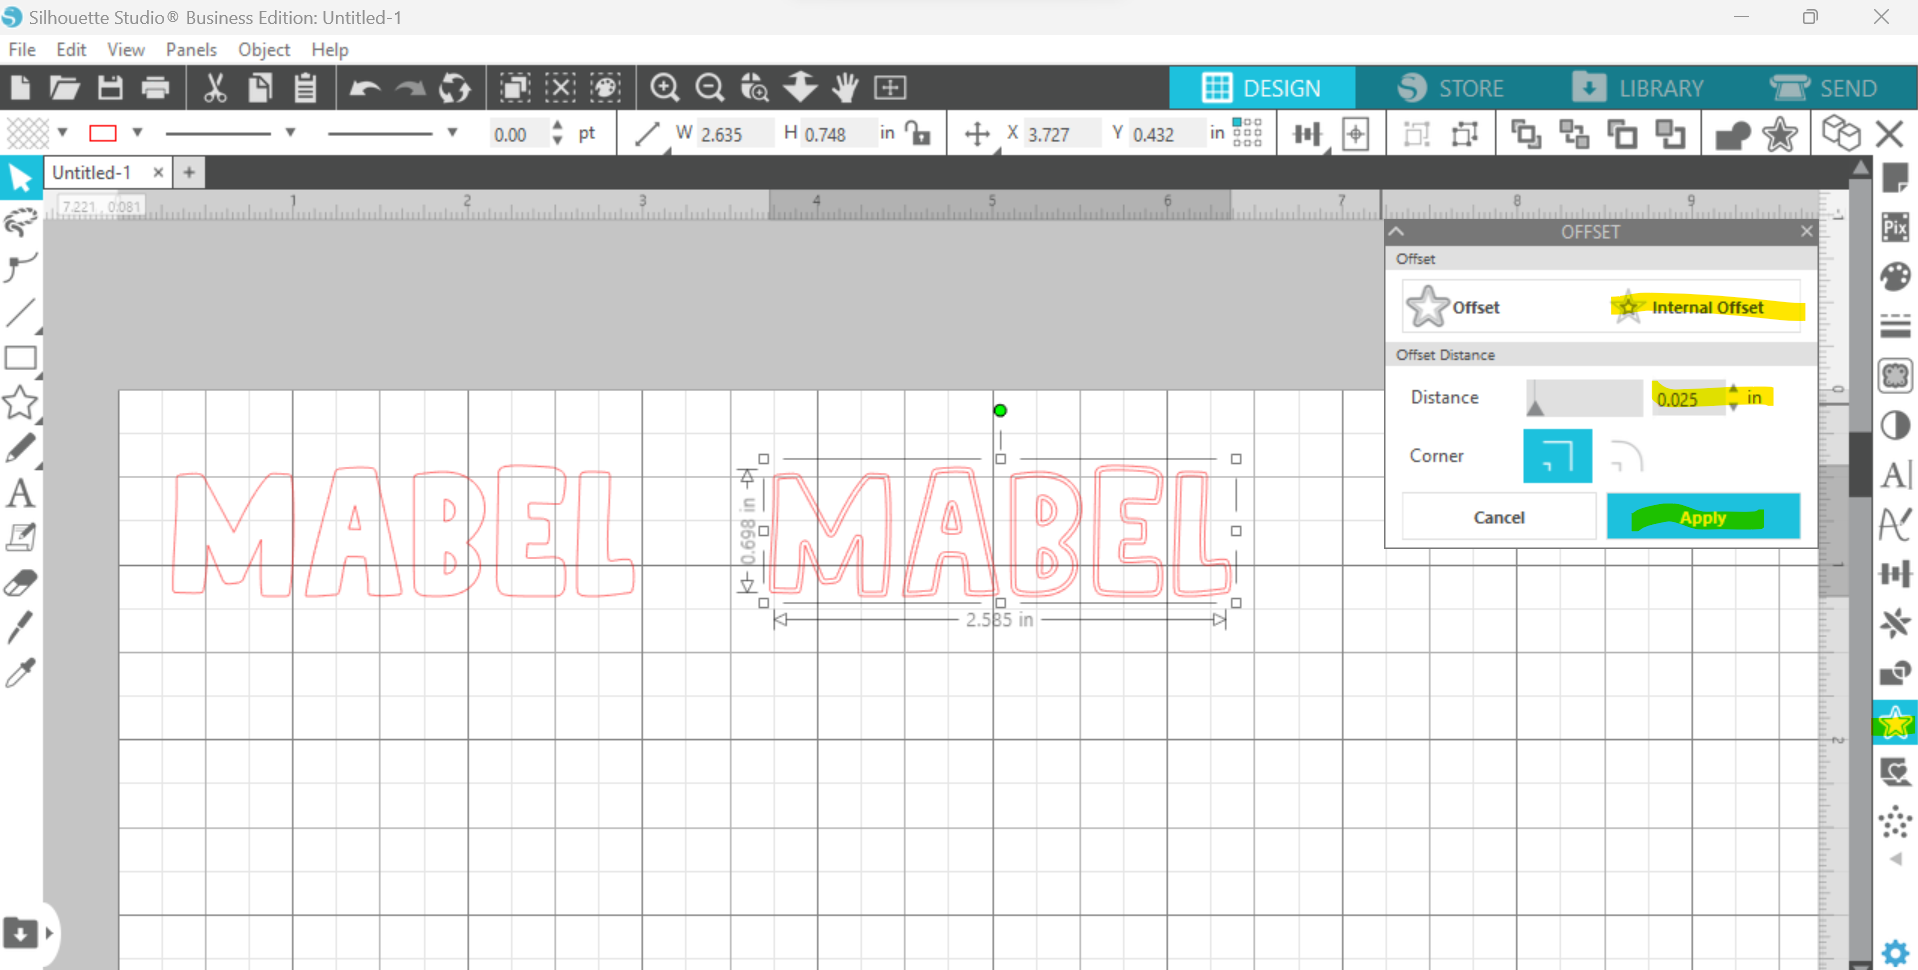
Create your scoring lines for placement by selecting the "Internal Offset" and adjusting the distance to 0.025 inches. I keep the corners rounded. Then click "Apply."
Before clicking off the new path, cut & paste this new text off to the side so it is separated from the original text. You can do this with keyboard shortcuts CTRL + X and CTRL + V (Windows) or CMD + X and CMD + V (Mac) or by right clicking and selecting cut and paste. This just makes it so your inset text isn't grouped to the original.
-
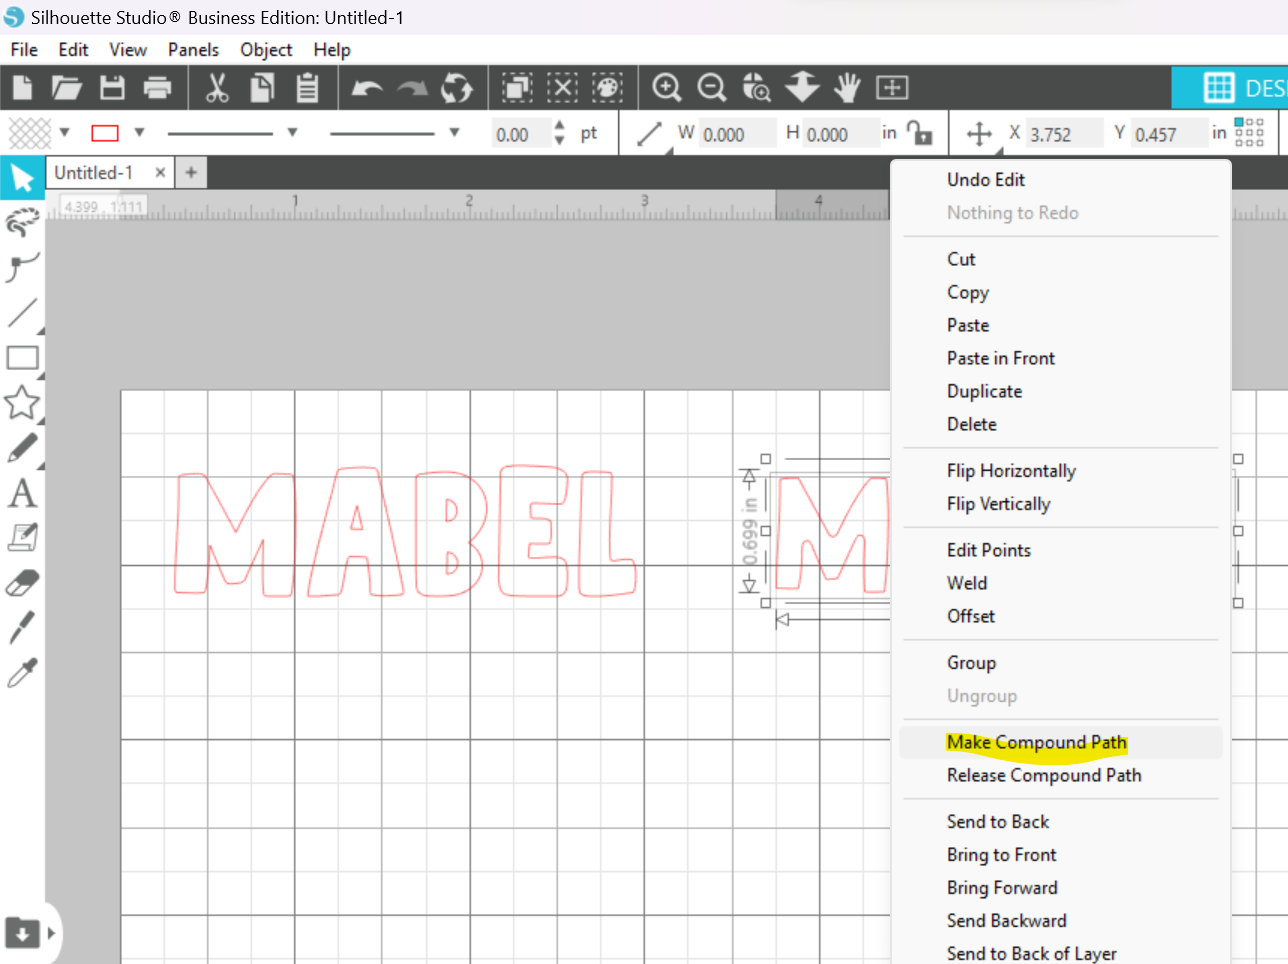
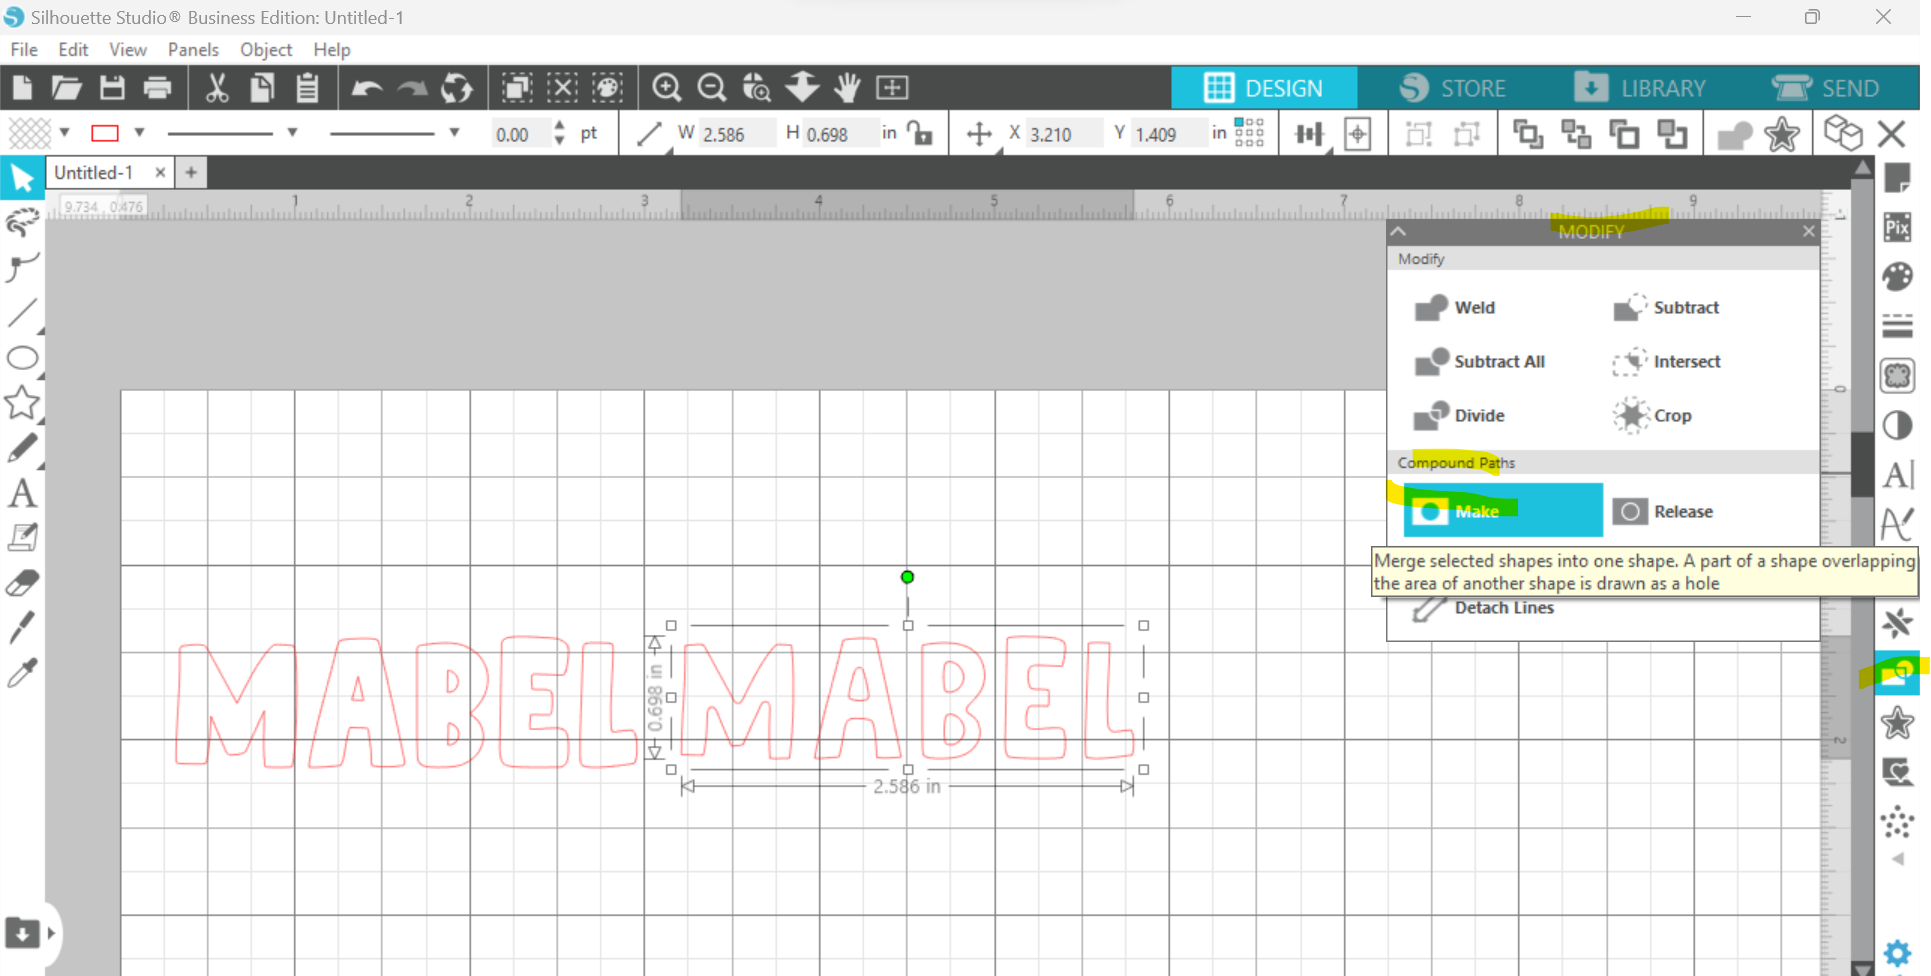
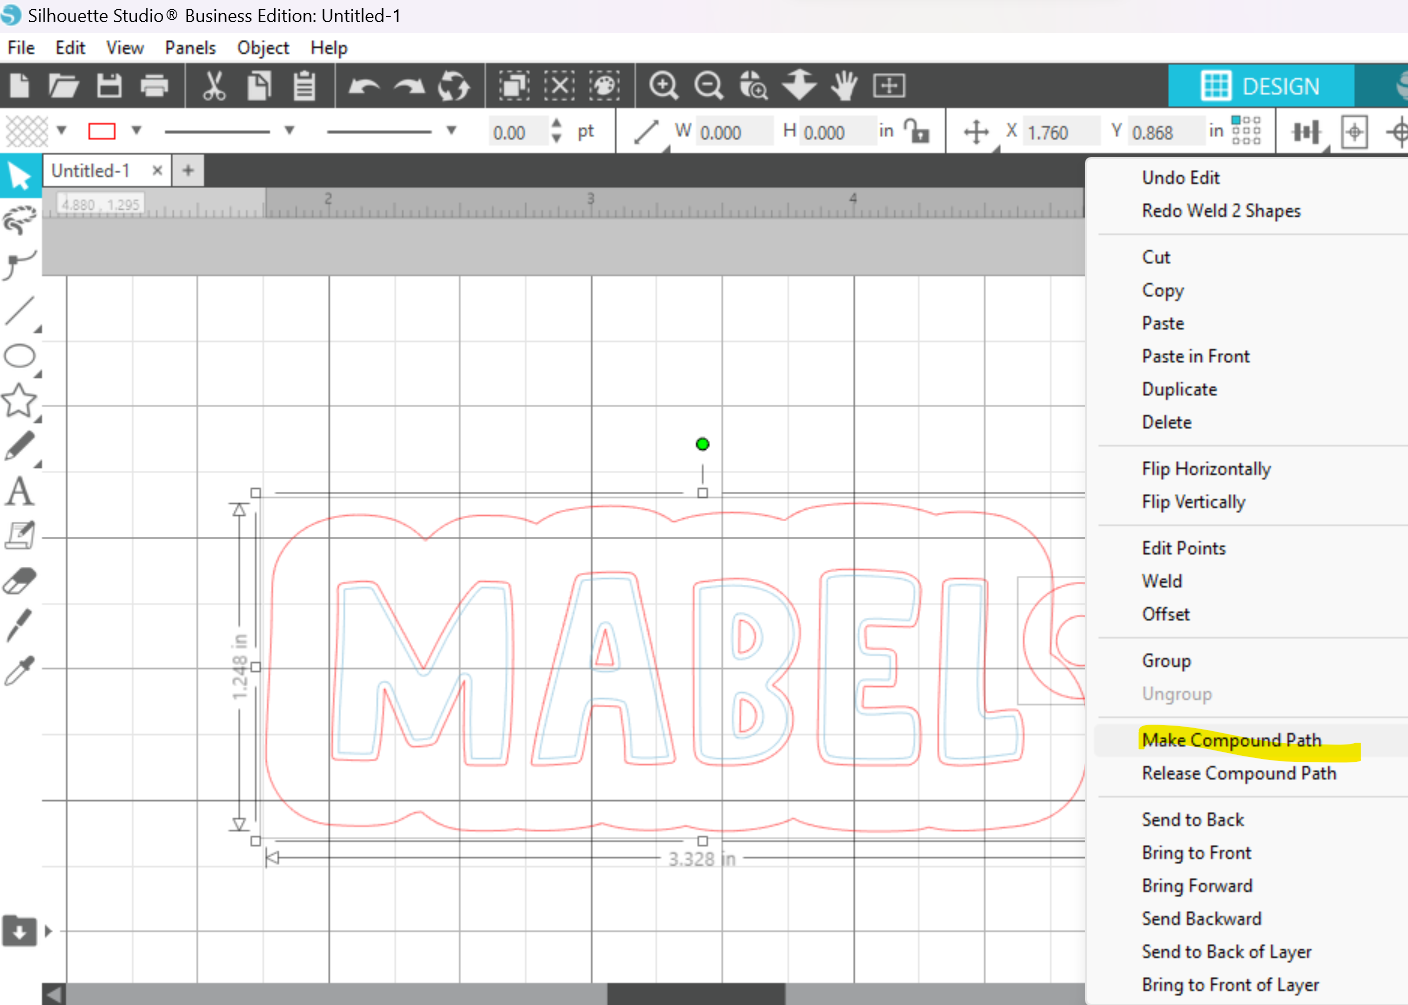
With all of your new letters highlighted, create a compound path. You can do this by right clicking and selecting "Make Compound Path" or opening the "Modify" window (either from the "Panel" menu or selecting the rectangle/circle icon on the righthand side toolbar) and choosing "Make" under "Compound Path."
-
Click back on your regular sized text and return to the "Offset" panel. This time, you are going to select "Offset," not "Internal Offset." I like to use 0.25 inches. You will not need to cut & paste it this time around.
Click "Apply" and then delete the text inside of the offset.
-
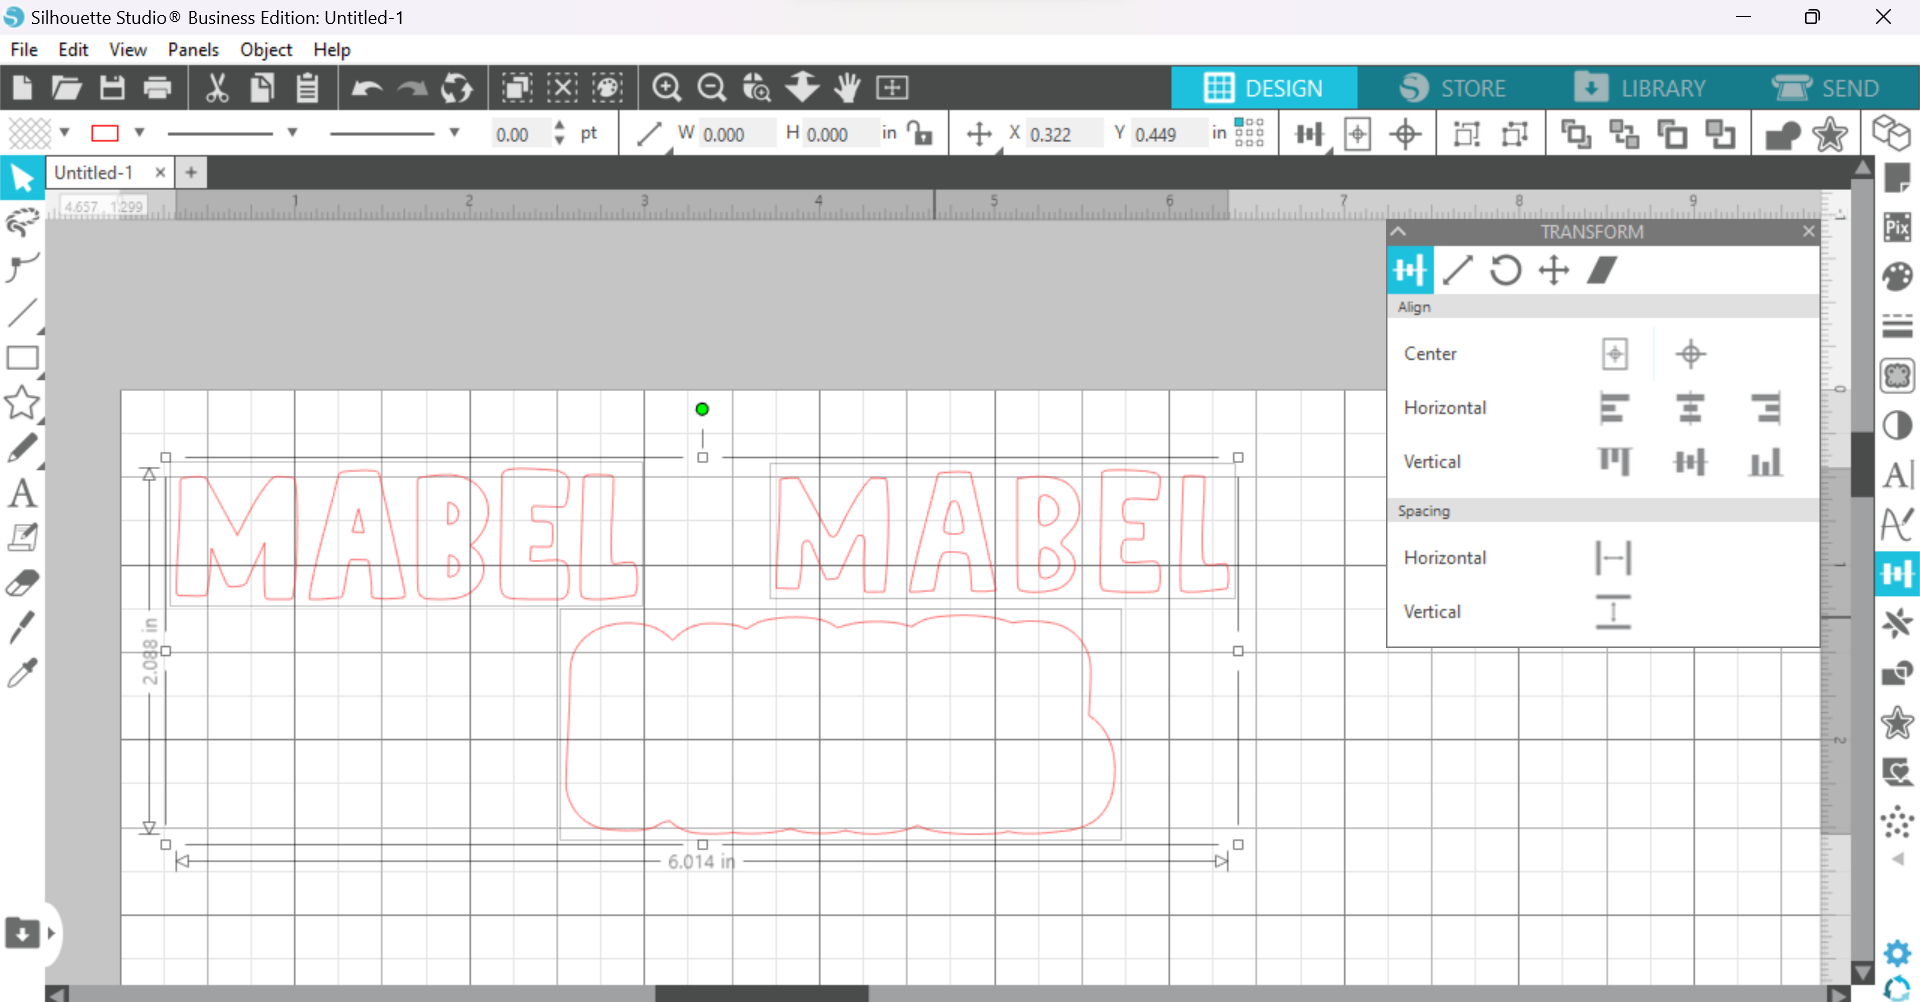
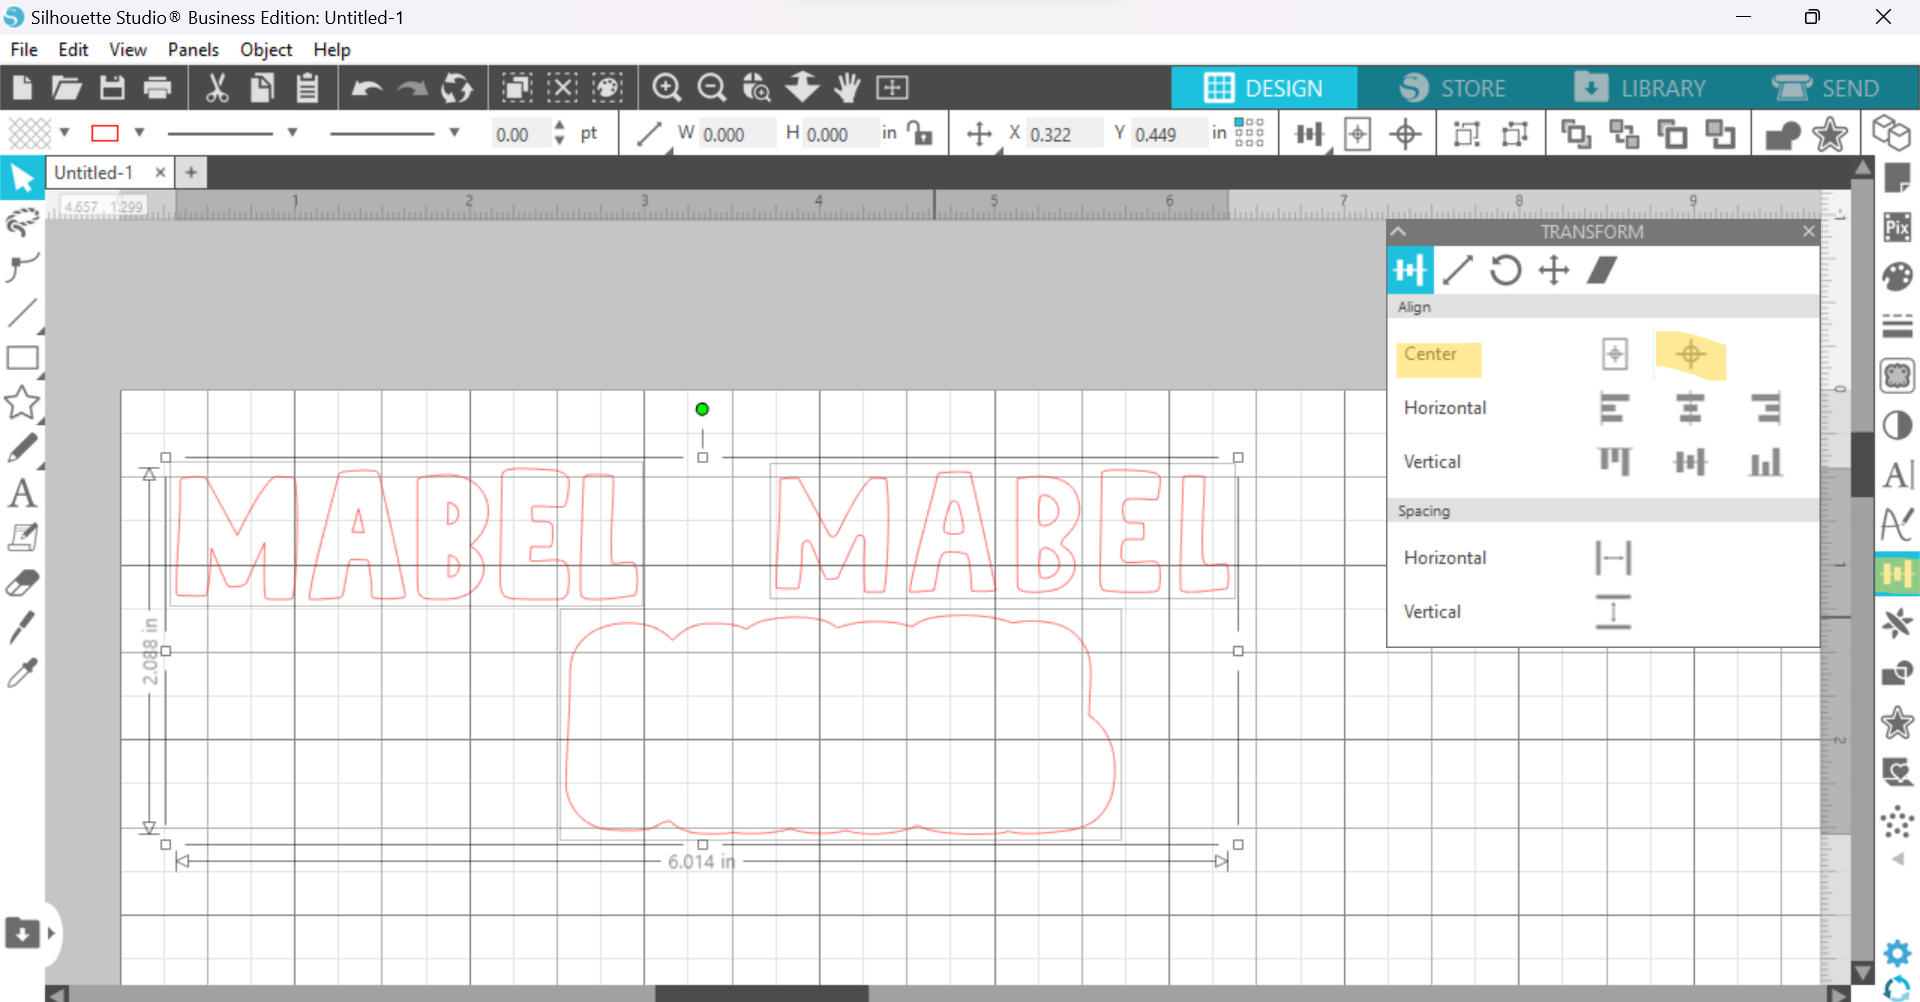
Highlight all 3 elements (your original version of the text, the inset text, and your outer offset for the backer. Open the "Transform" panel by either going to the "Panels" menu or by selecting the icon on your right side toolbar that looks like a bar graph.
-
Select the "Centers" option under "Align."
-
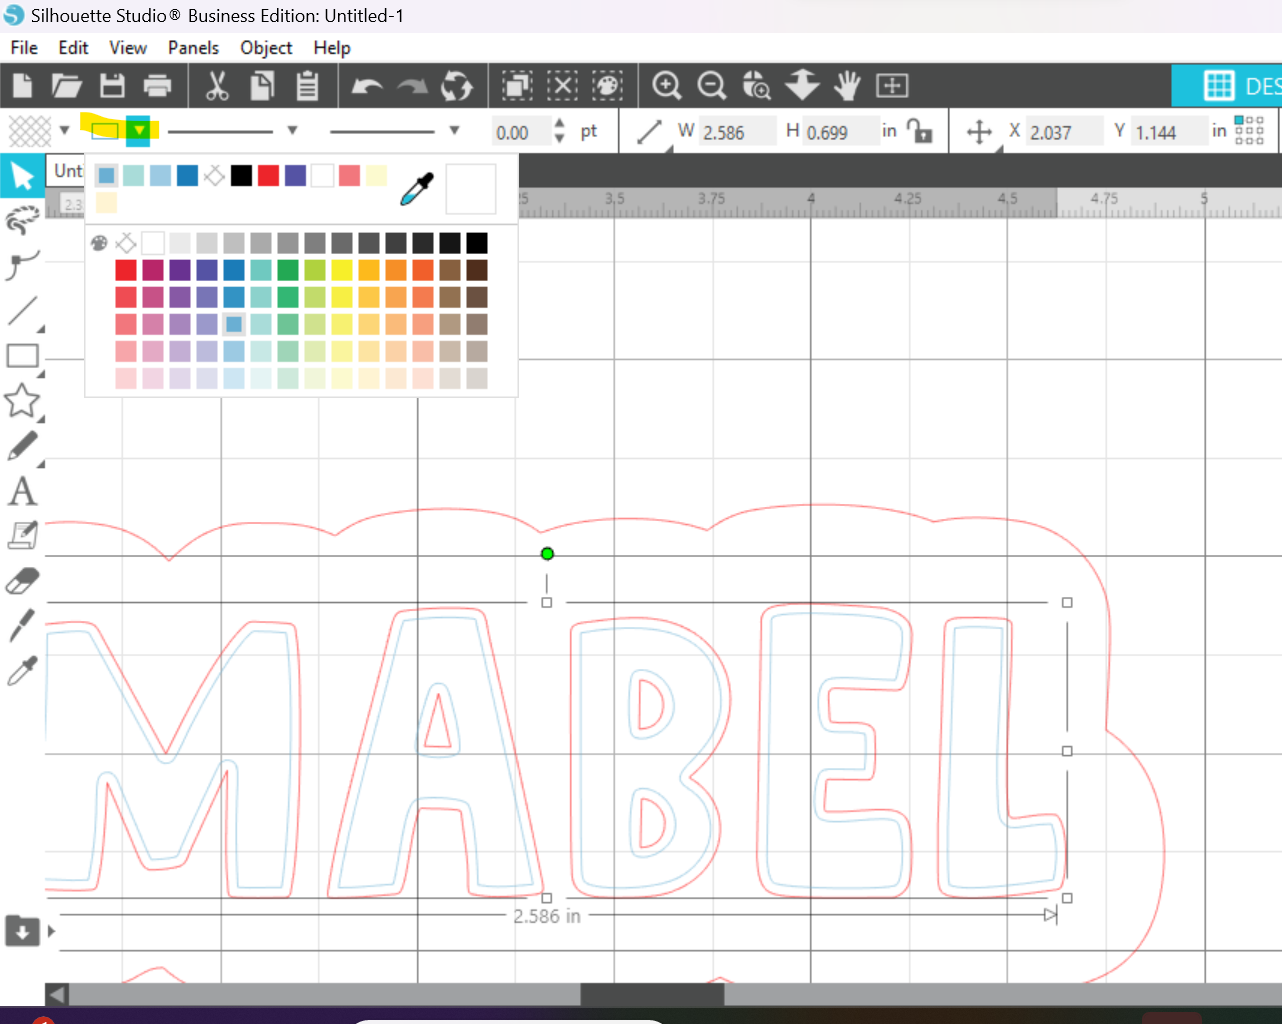
Once everything is lined up, you can adjust the colors. Change the inner offset to a different color for scoring and leave the outer offset and the text a separate color for cutting. You can change the stroke appearance by selecting an element and going to the drop down menu under the save icon. My default colors are red stroke for cut and blue stroke for score, but you can use any two colors - they just need to be different.
-
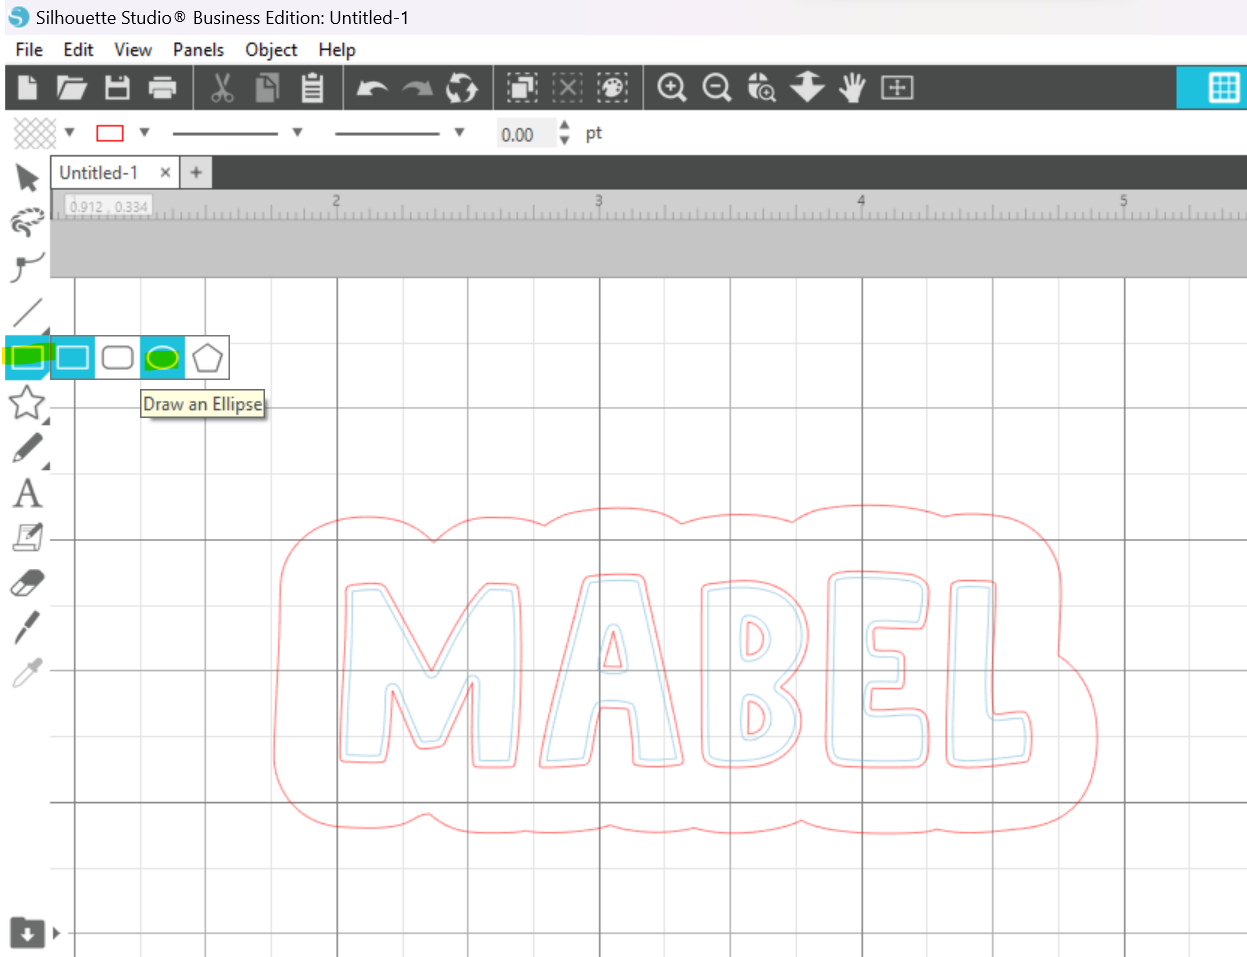
Next up, we will create the hole for hardware. Use the "Ellipse" tool to create a circle, and then adjust the size at the top of the page to 0.19 inches height and width.

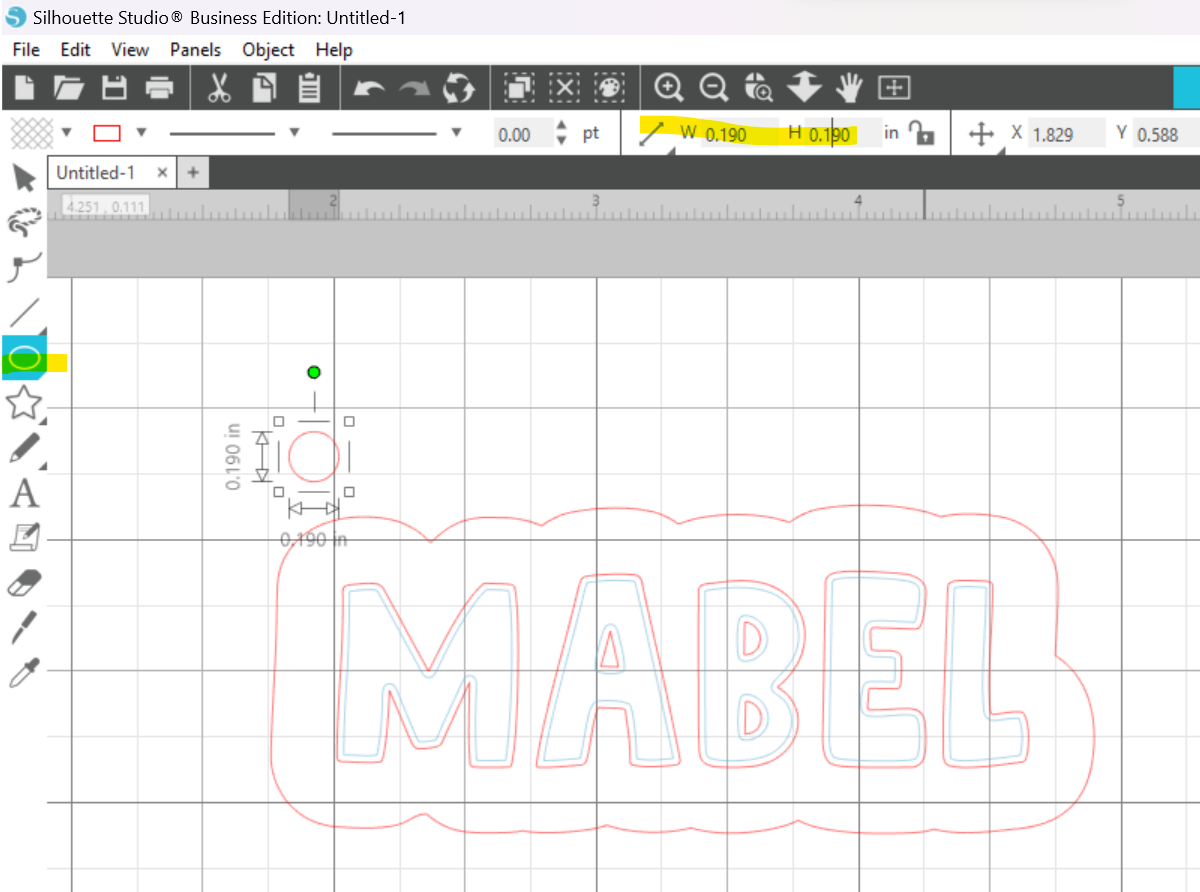
-
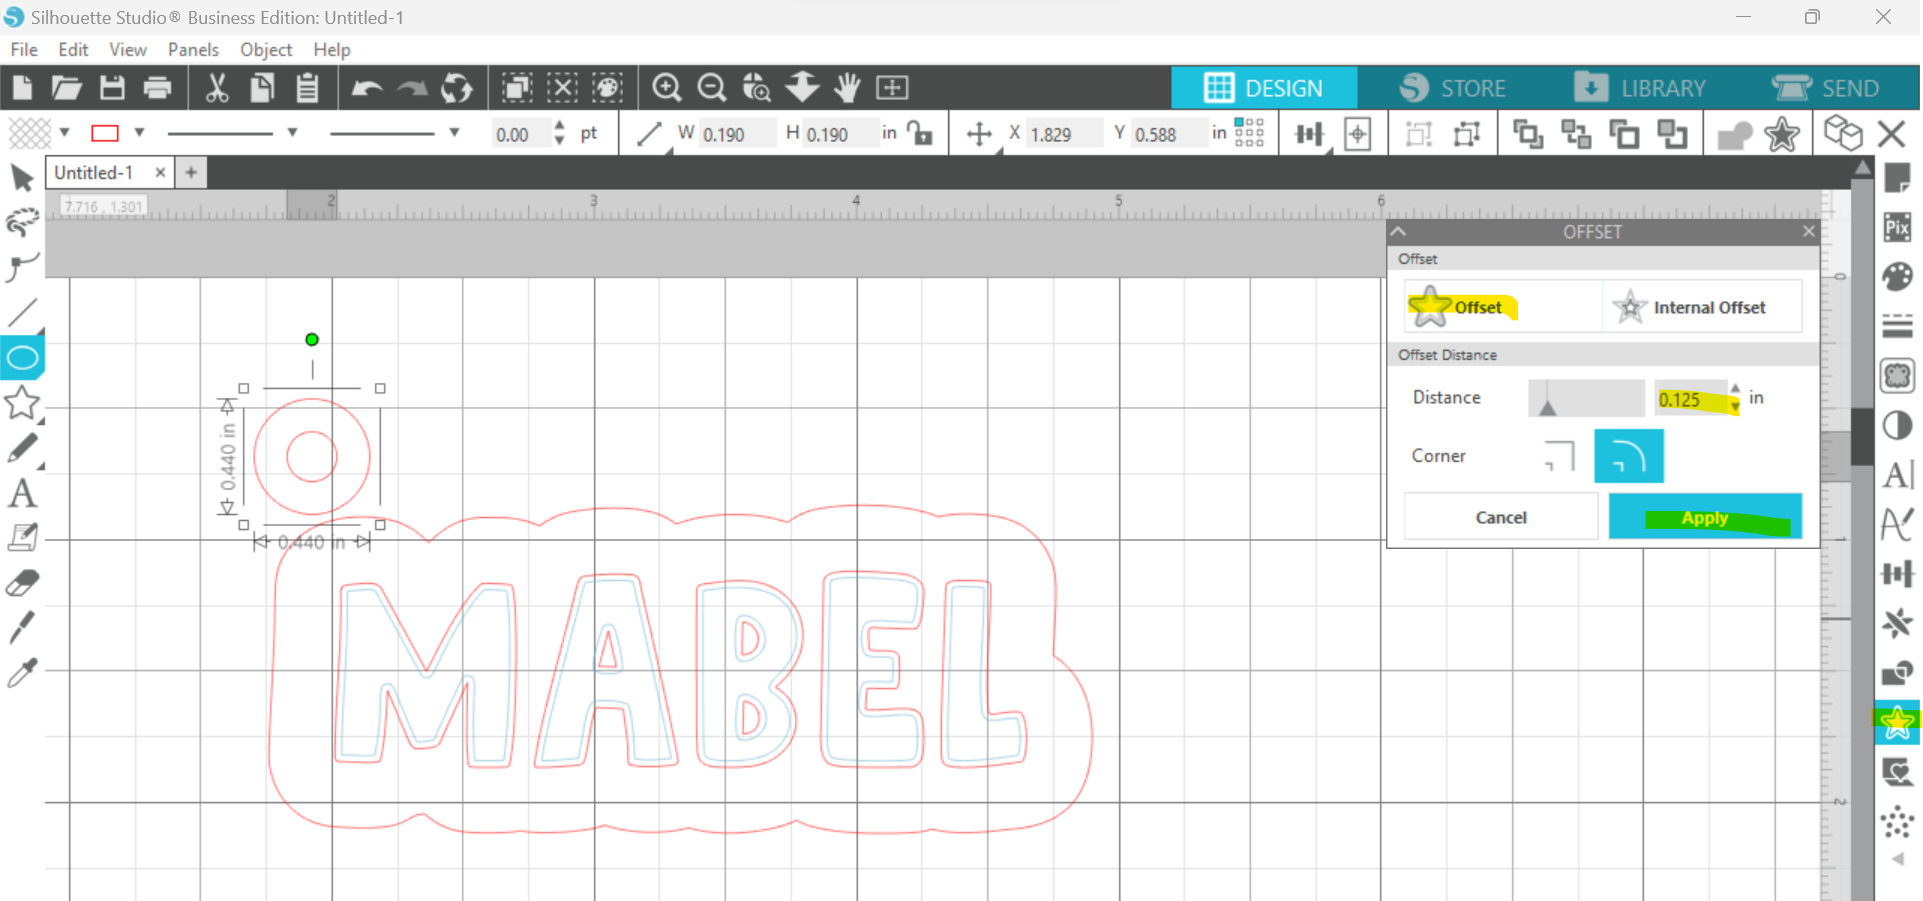
Add an offset to this circle using the "Offset" panel at 0.125 inches. This will make your outer circle 0.315 inches and will keep them lined up by their center points.
-
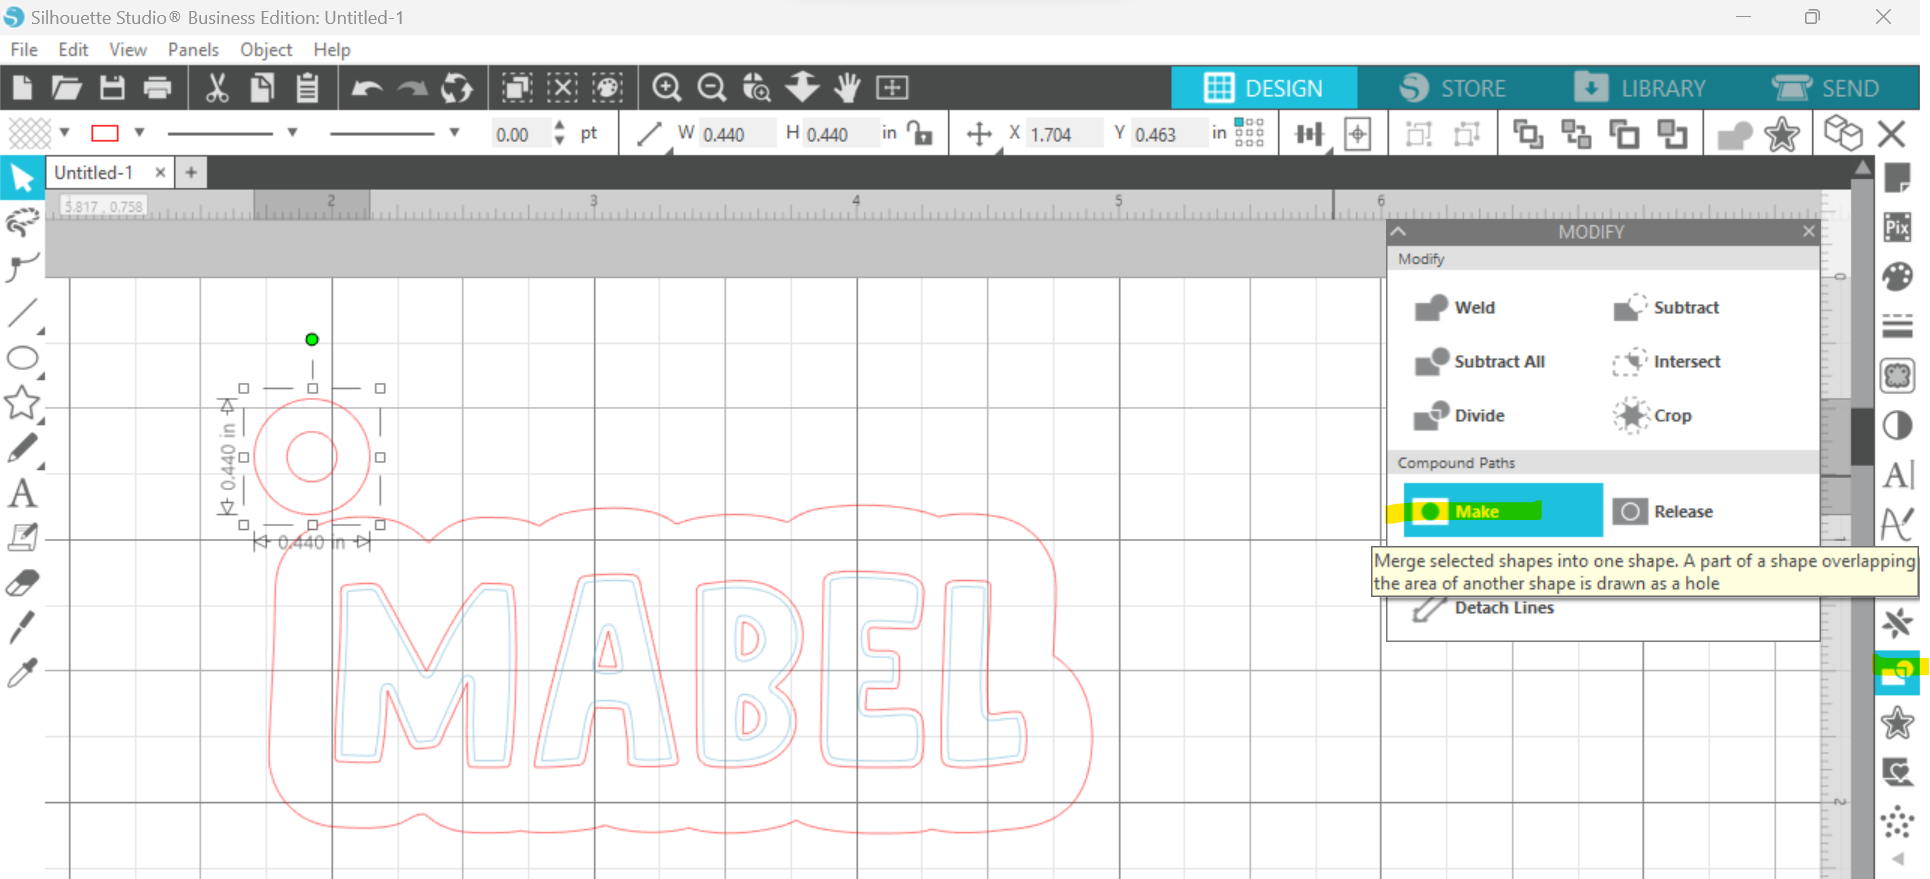
Highlight both circles and make them into a compound path, either by using the "Modify" panel or by right clicking.
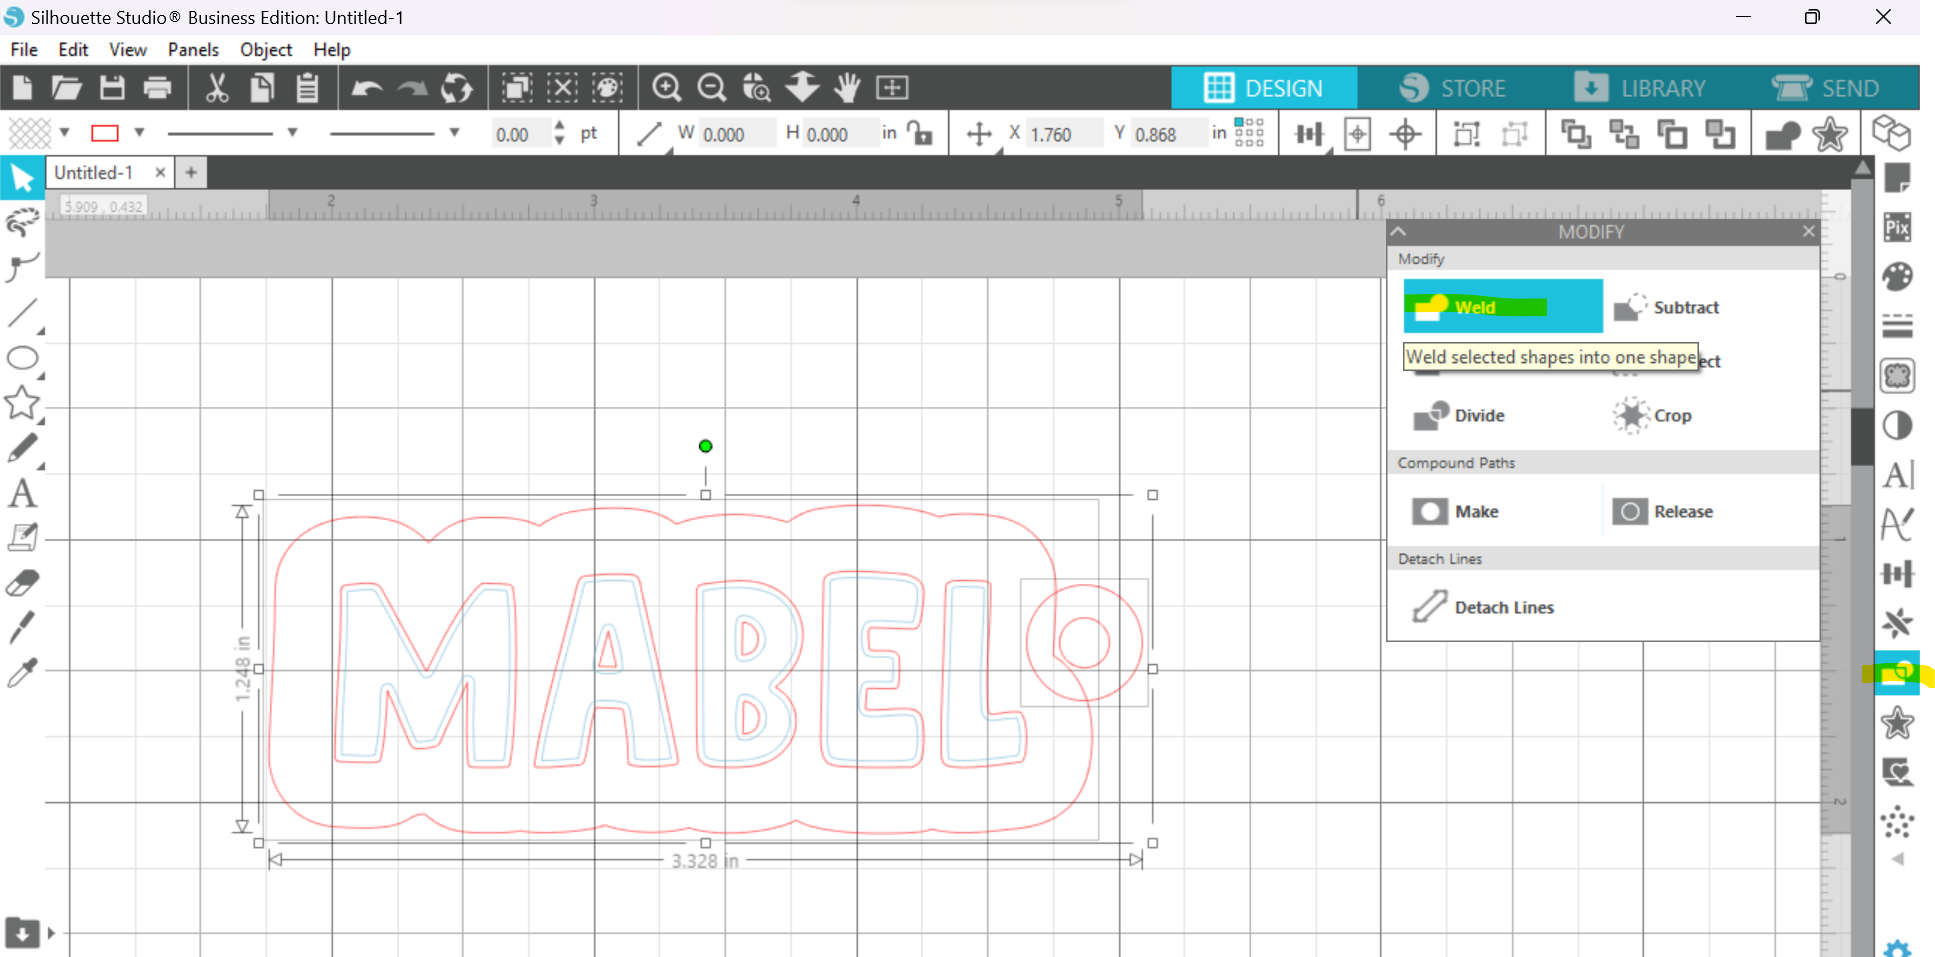
Line up your circles with where you want the hardware to go on your contour backer. Make sure the inside circle is not cut off by the contour cut line you have created. The full inner circle should be placed on the outside of the contour cut line.
Once you are satisfied with the placement, select both the circle piece and the contour outline and weld them together. You can do this by opening the "Modify" panel and selecting "Weld," or by right clicking and selecting "Weld."
Since you will be cutting your text out to layer it on the backer, you don't want it to stay lined up. You can move it off to the side at this point.
-
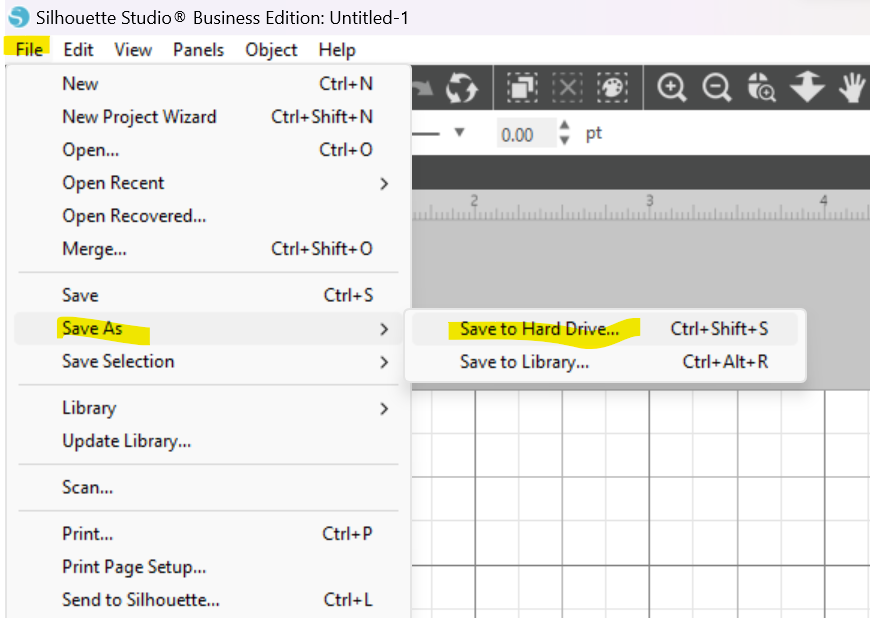
Go to "File" and select "Save As" then "Save to Hard Drive" and save your file as an SVG.
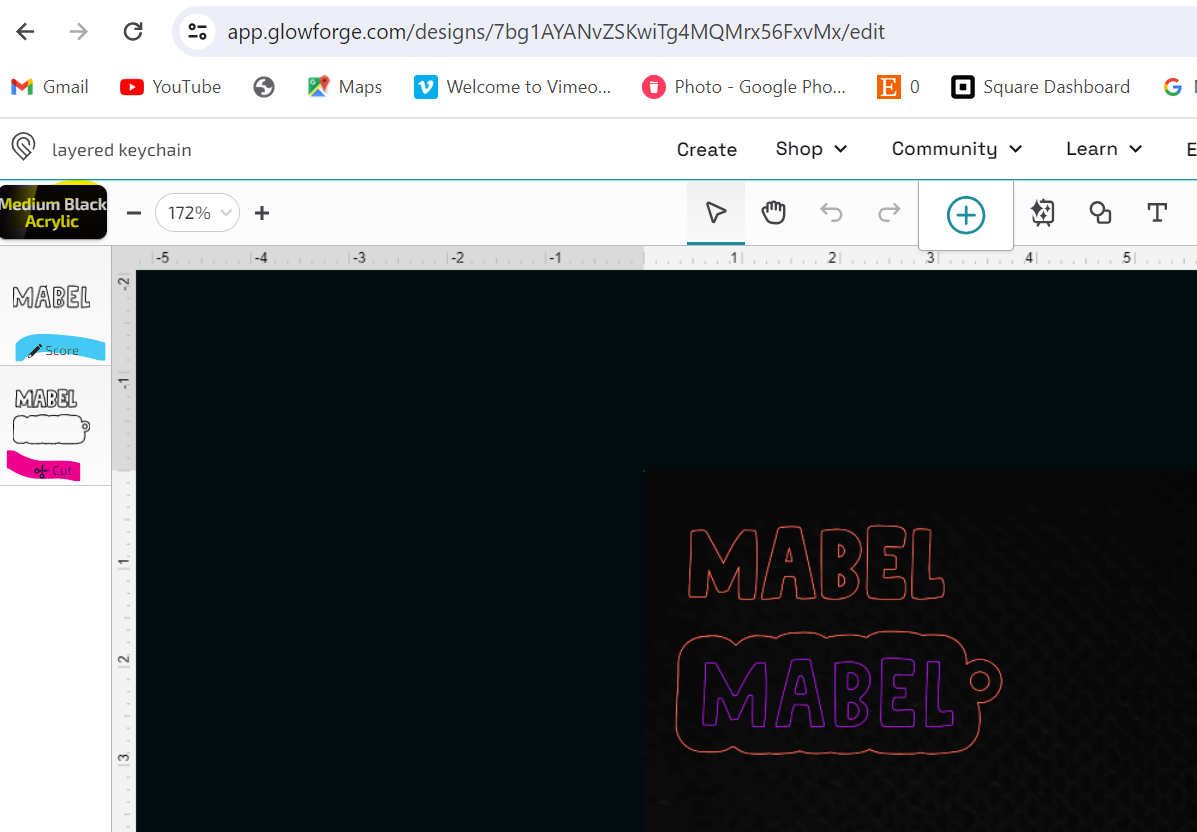
Upload in your Glowforge portal (or whatever program you use to send to your laser if using a different one!)
-
Assign your functions based on the different groups. The inset text will be scored and the rest will be cut.
Run your print. If you are using double sided adhesive, only apply it to the back of the material you are cutting your letters from.
-
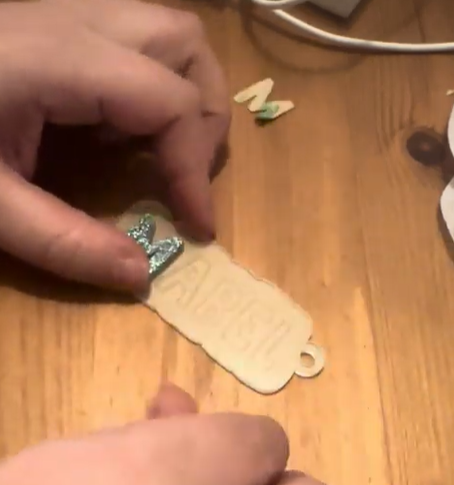
Assemble by placing your letters over top of the scored placement lines.
-
Add your keychain thingie and your split ring.
Ta da! You are done! I would love to see pics if you try this yourself. You can tag me on all social media platforms @samanthasdoodles.